
Provide load balancing, SSL termination and name-based virtual hosting on a Kubernetes (k3s) cluster using Traefik ingress controller.
MY_DOMAIN, please change accordingly. If you interested in a local-only work mode, you don’t have to pay for a new domain, just decide on a name and use it. For example, if your desired domain is homelab.com, replace MY_DOMAIN with homelab.Prerequisites
- Setting Up a Raspberry Pi Cluster
- Install Rancher K3s on Raspberry Pi Cluster
- Installing Helm, Kubernetes Package Manager
- Install Certificate Manager Controller in Kubernetes
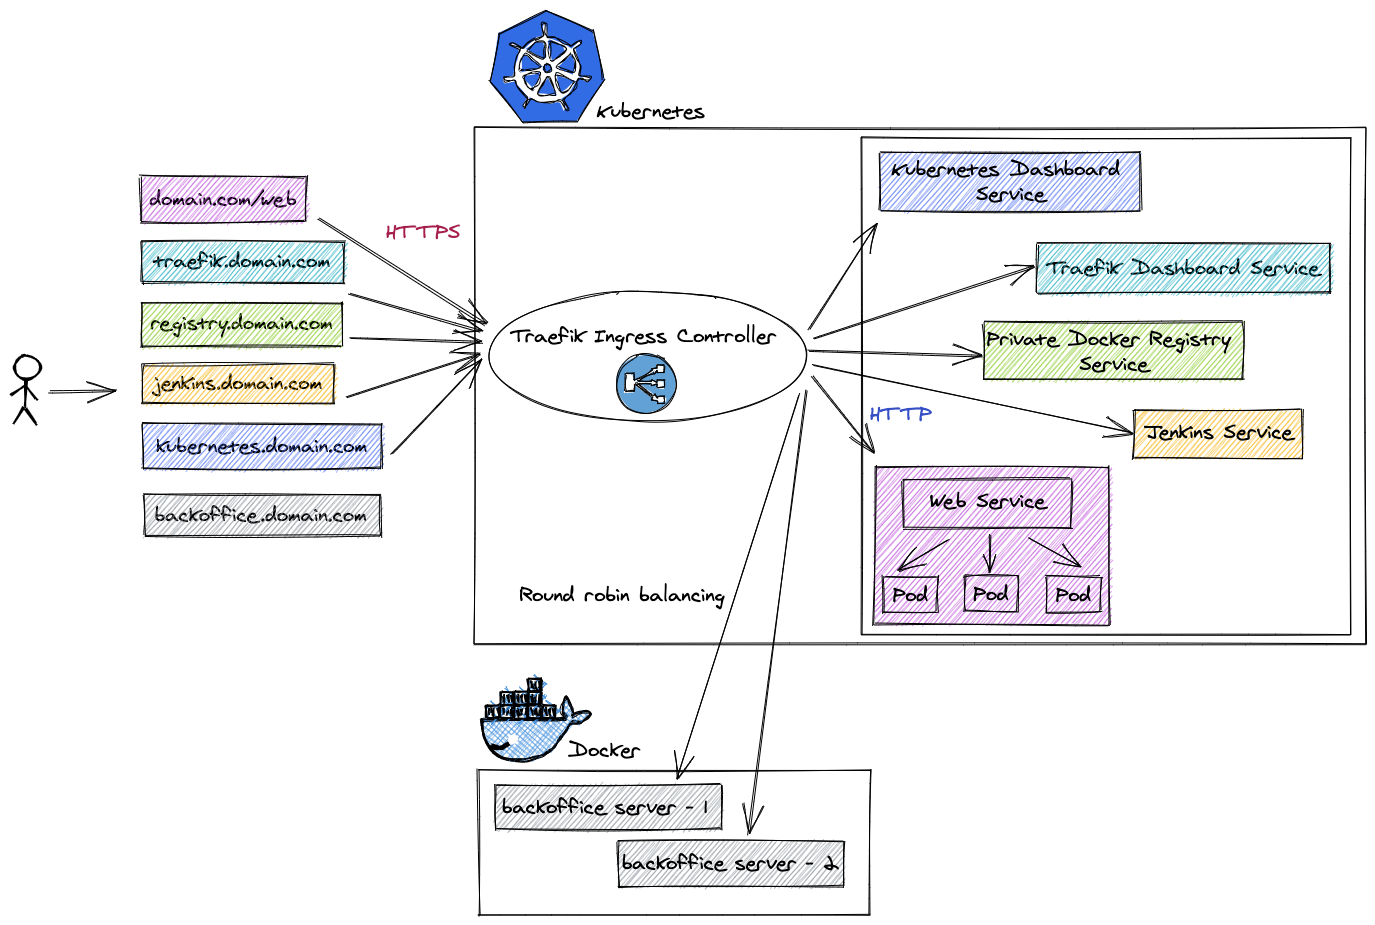
What is an Ingress Controller? It is an API object that manages external access to a deployed service in a Kubernetes cluster, typically via HTTP/S. It provides load balancing, SSL termination and name-based virtual hosting.
Why would I want to use an Ingress Controller? These are some of the immediate benefits using an ingress controller:
-
Simplify the way internal services interact with each other and re-route when required by changing only the Traefik routing rule.
Note: Instead of relying on an IP address that might change, simply define a hosted name e.g.serviceA.domain.comto addressserviceAand use that on other internal services and/or from outside the cluster when in need to callserviceA.
Isn’tserviceA.domain.comeasier to remember than192.169.200.xxx? - Allows HTTPS traffic from outside the Kubernetes cluster while terminating encryption and allowing HTTP traffic between services within the cluster
- Load balance traffic between services hosted outside the Kubernetes cluster
K8s Controller
Traefik is a Kubernetes controller that manage the access to cluster services by supporting the Ingress specification. It receives requests on behalf of your system and finds out which components are responsible for handling them.
Prepare
We want Kubernetes to create the Traefik pod on the master node. In order to do that, we’ll have to label that node and use nodeSelector attribute when installing Traefik Helm chart.
-
Get all nodes names and labels
1
kubectl get nodes --show-labels -
Label
kmasternode withnode-type=master1
kubectl label nodes kmaster node-type=masterNote: To remove a label, use the same command with dash after the label name e.g.kubectl label nodes kmaster node-type-. -
Verify that label had been created successfully
1
kubectl get nodes --show-labels | grep node-type
Install
-
Create a
traefiknamespace1
kubectl create namespace traefik
-
Add the
containousHelm repository hosting the Traefik charts metadata1
helm repo add traefik https://containous.github.io/traefik-helm-chart
-
Update local Helm chart repository cache
1
helm repo update
-
Search for latest
traefik/traefikofficial Helm chart version1 2 3 4
helm search repo traefik # NAME CHART VERSION APP VERSION # traefik/traefik 9.1.1 2.2.8
-
Install the Traefik Helm chart using the version from previous step
1
2
3
4
5
6
7
8
helm upgrade --install traefik \
    --namespace traefik \
    --set dashboard.enabled=true \
    --set rbac.enabled=true \
    --set nodeSelector.node-type=master \
    --set="additionalArguments={--api.dashboard=true,--log.level=INFO,--providers.kubernetesingress.ingressclass=traefik-internal,--serversTransport.insecureSkipVerify=true}" \
    traefik/traefik \
    --version 9.1.1
-
Verify installation
1
2
3
4
5
# Make sure all traefik deployed pods are running
kubectl get pods --namespace traefik

# Make sure custom resources *.traefik.containo.us were created successfully
kubectl get crd | grep traefik
Uninstall
-
Remove
traefikfrom the cluster1
helm uninstall traefik --namespace traefik -
Clear the
traefiknamespace1
kubectl delete namespaces traefik
Traefik Dashboard
Dashboard is installed but disabled by default for security reasons. We will want to avoid using the kubectl proxy-forward option and allow the dashboard via HTTPS with proper TLS/Cert.
Certificate
We will create a certificate using cert-manager to allow accessing the Traefik dashboard via the hosted name traefik.MY_DOMAIN.com within our home network. Create a self signed certificate as described in here under traefik namespace.
Verify that a TLS secret had been created for the certificate:
1
kubectl get secret MY_DOMAIN-com-cert-secret --namespace traefik
Authentication
We will create a user / password basic authentication, please read here if you wish to use a different method.
-
Generate a flat-file that stores a username and password for basic authentication
1
2
3
4
5
6
7
8
9
10
11
12
13
14
15
16
17
18
bash <<'EOF'

# Change these credentials to your own
export TRAEFIK_UI_USER=admin
export TRAEFIK_UI_PASS=dashboard
export DESTINATION_FOLDER=${HOME}/temp/traefik-ui-creds

# Backup credentials to local files (in case you'll forget them later on)
mkdir -p ${DESTINATION_FOLDER}
echo $TRAEFIK_UI_USER >> ${DESTINATION_FOLDER}/traefik-ui-user.txt
echo $TRAEFIK_UI_PASS >> ${DESTINATION_FOLDER}/traefik-ui-pass.txt

htpasswd -Bbn ${TRAEFIK_UI_USER} ${TRAEFIK_UI_PASS} \
    > ${DESTINATION_FOLDER}/htpasswd

unset TRAEFIK_UI_USER TRAEFIK_UI_PASS DESTINATION_FOLDER

EOF
-
Create a Kubernetes secret based on the basic authentication file
1
2
3
kubectl create secret generic traefik-dashboard-auth-secret \
   --from-file=$HOME/temp/traefik-ui-creds/htpasswd \
   --namespace traefik
Ingress
-
Create an
IngressRoutefor accessing the dashboard, make sure to replaceMY_DOMAINwith your domain name1 2 3 4 5 6 7 8 9 10 11 12 13 14 15 16 17 18 19 20 21 22 23 24 25 26 27 28 29 30
cat <<EOF | kubectl apply -f - apiVersion: traefik.containo.us/v1alpha1 kind: IngressRoute metadata: name: traefik-dashboard namespace: traefik spec: entryPoints: - websecure routes: - kind: Rule match: Host(\`traefik.MY_DOMAIN.com\`) && (PathPrefix(\`/api\`) || PathPrefix(\`/dashboard\`)) services: - name: api@internal kind: TraefikService middlewares: - name: traefik-dashboard-auth # Referencing the BasicAuth middleware namespace: traefik tls: secretName: MY_DOMAIN-com-cert-secret --- apiVersion: traefik.containo.us/v1alpha1 kind: Middleware metadata: name: traefik-dashboard-auth namespace: traefik spec: basicAuth: secret: traefik-dashboard-auth-secret EOF
-
Check that resources were created successfully
1
2
3
4
5
# IngressRoute
kubectl describe ingressroute traefik-dashboard --namespace traefik

# Middleware
kubectl describe middleware traefik-dashboard-auth --namespace traefik
-
Check there are no error logs
1
kubectl logs -f $(kubectl get pods --namespace traefik | grep "^traefik" | awk '{print $1}') --namespace traefik
-
Set a hosted name
traefik.MY_DOMAIN.comon a client machine (laptop/desktop)1 2 3 4 5 6
# Edit the file using `sudo /etc/hosts` # Append manualy to the existing k3s hosted name 111.222.333.444 kmaster, traefik.MY_DOMAIN.com # Alternatively, add a new hosted name entry with a one-liner echo -e "111.222.333.444\ttraefik.MY_DOMAIN.com" | sudo tee -a /etc/hosts
Note: Replace111.222.333.444with thek3smaster node IP address andMY_DOMAINwith your domain name. -
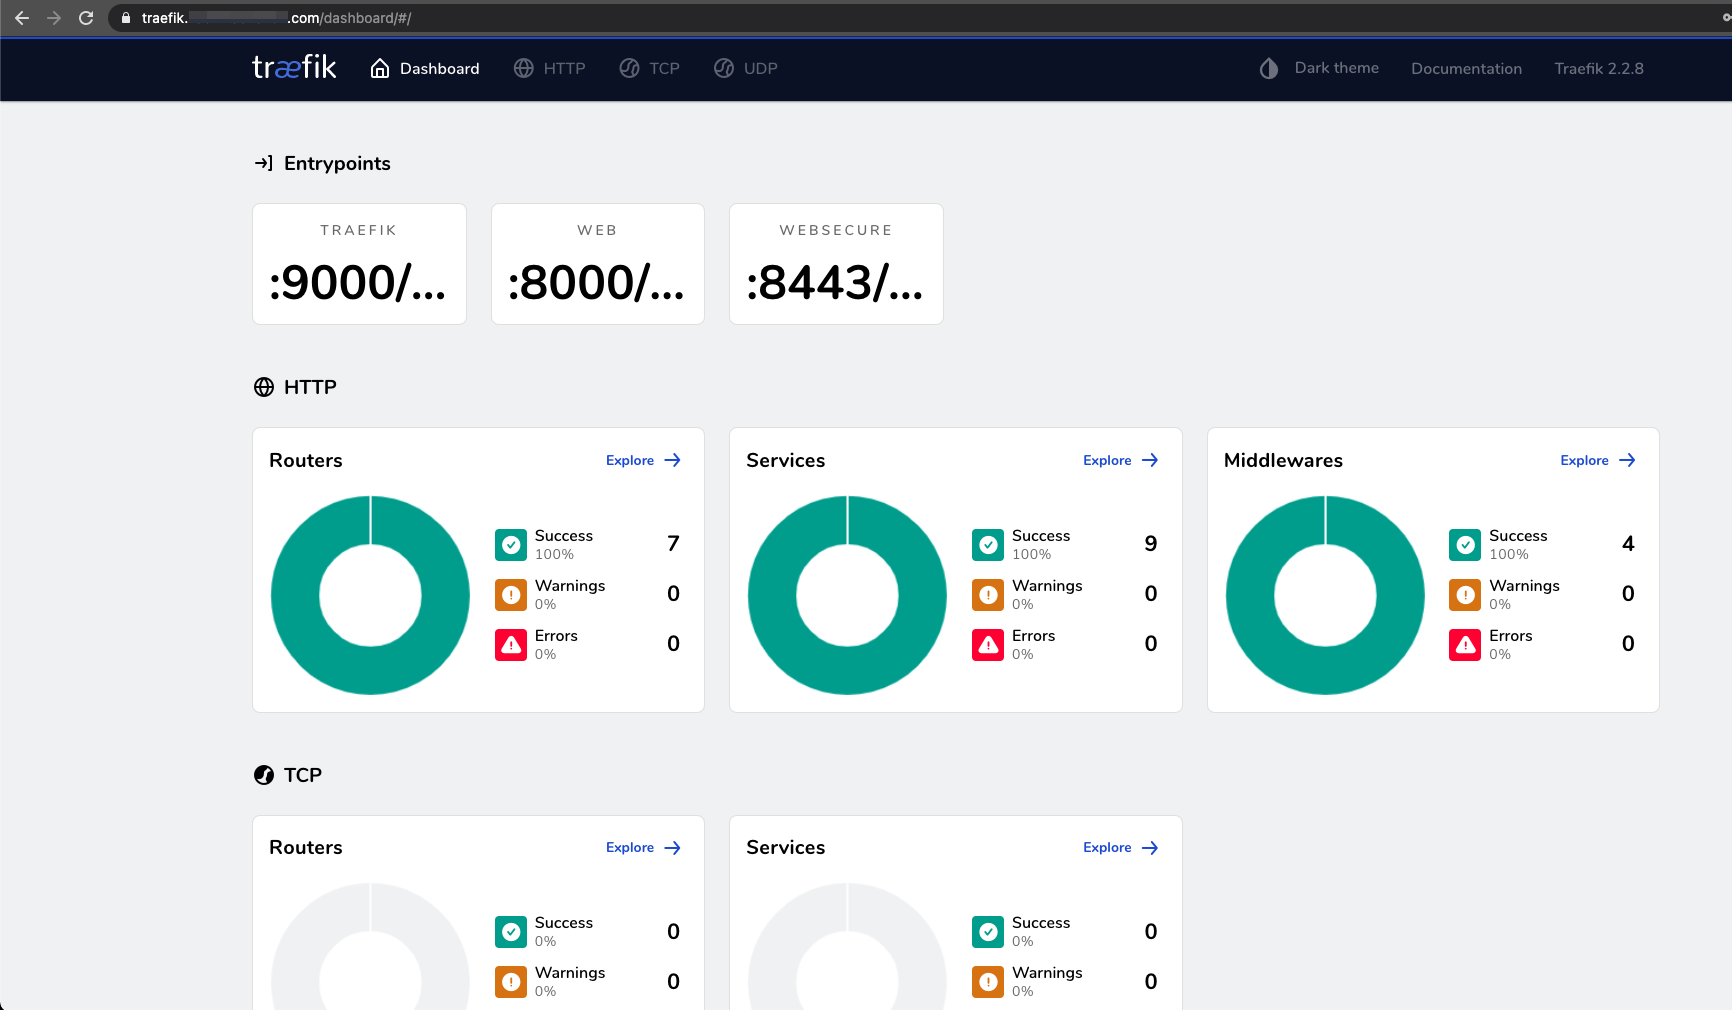
Open browser at https://traefik.MY_DOMAIN.com/dashboard/
Note: If you encounter an untrusted certificate warning, please follow the cert-manager post Trust section for instructions on how to trust thetraefikcertificate.Show Dashboard
Demo Application
We will deploy an example whoami application that returns basic information about the client issuing the request. It’ll allow us to check that Traefik was deployed successfully by addressing our demo application using whoami.MY_DOMAIN.com.
Prepare
Before deploying our application to the Kubernetes cluster, we will have to define which node(s) are eligible of assigning pods for it.
We will use the node-type=master label created at the Prepare step of the Traefik installation. To assign the whoami pod(s) to the kmaster node, we will use the nodeSelector attribute on a Kubernetes resource (Deployment / Pod) with that label.
Install
-
Create a
playgroundnamespace1
kubectl create namespace playground
-
Create Kubernetes
DeploymentandServicewith x2 running instances of thewhoamiapplication1 2 3 4 5 6 7 8 9 10 11 12 13 14 15 16 17 18 19 20 21 22 23 24 25 26 27 28 29 30 31 32 33 34 35 36 37 38 39 40 41 42
cat <<EOF | kubectl apply -f - apiVersion: apps/v1 kind: Deployment metadata: name: whoami namespace: playground labels: app: containous name: whoami spec: replicas: 2 selector: matchLabels: app: containous task: whoami template: metadata: labels: app: containous task: whoami spec: nodeSelector: node-type: "master" containers: - name: containouswhoami image: containous/whoami ports: - containerPort: 80 --- apiVersion: v1 kind: Service metadata: name: whoami namespace: playground spec: ports: - name: http port: 80 selector: app: containous task: whoami EOF
Note: Please refer to the official docs to read more about KubernetesDeploymentorService. -
Verify both
DeploymentandServicewere created successfully1 2 3 4 5 6 7 8
# Deployment should indicate 2/2 running pods kubectl get deployments -n playground # Service should indicate a cluster IP on port 80 without an external IP kubectl get services -n playground # Check that there are x2 running pods on kmaster node kubectl describe pods whoami -n playground | grep "Status:"
Uninstall
-
Follow the installation instructions for
Deployment,Service,IngressRoute,Middlewareand execute both scripts while replacing thekubectlaction:1 2 3 4 5 6 7 8 9
# Instead of using apply cat <<EOF | kubectl apply -f - ... EOF # Replace with delete cat <<EOF | kubectl delete -f - ... EOF
-
Clear the
playgroundnamespace1
kubectl delete namespaces playground
Certificate
We will have to create a certificate using cert-manager to allow accessing the whoami application using the hosted name whoami.MY_DOMAIN.com within our home network. Create a self signed certificate as described in here under playground namespace.
Verify that a TLS secret had been created for the certificate:
1
kubectl get secret MY_DOMAIN-com-cert-secret --namespace playground
Ingress
-
Create ingress entry points to allow secure communication using
HTTPSand allowingHTTPwithHTTPSredirect middleware (make sure to replaceMY_DOMAINwith your domain name)1 2 3 4 5 6 7 8 9 10 11 12 13 14 15 16 17 18 19 20 21 22 23 24 25 26 27 28 29 30 31 32 33 34 35 36 37 38 39 40 41 42 43 44 45 46 47 48
cat <<EOF | kubectl apply -f - apiVersion: traefik.containo.us/v1alpha1 kind: IngressRoute metadata: name: whoami-https namespace: playground spec: entryPoints: - websecure routes: - match: Host(\`whoami.MY_DOMAIN.com\`) kind: Rule priority: 10 services: - name: whoami port: 80 tls: secretName: MY_DOMAIN-com-cert-secret --- apiVersion: traefik.containo.us/v1alpha1 kind: IngressRoute metadata: name: whoami namespace: playground spec: entryPoints: - web routes: - match: Host(\`whoami.MY_DOMAIN.com\`) kind: Rule priority: 10 services: # This IngressRoute will be never called due to the redirect middleware - name: whoami port: 80 middlewares: - name: https-redirect --- apiVersion: traefik.containo.us/v1alpha1 kind: Middleware metadata: name: https-redirect namespace: playground spec: redirectScheme: scheme: https permanent: true EOF
-
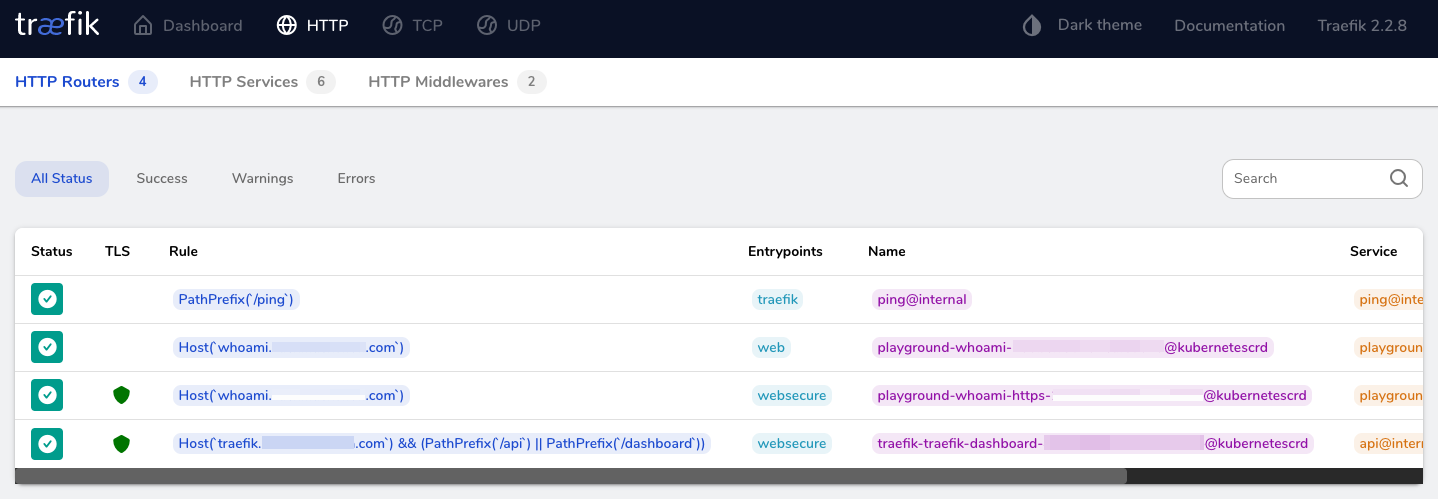
Verify success status of HTTP routers and middlewares using the traefik dashboard
Show HTTP Routers
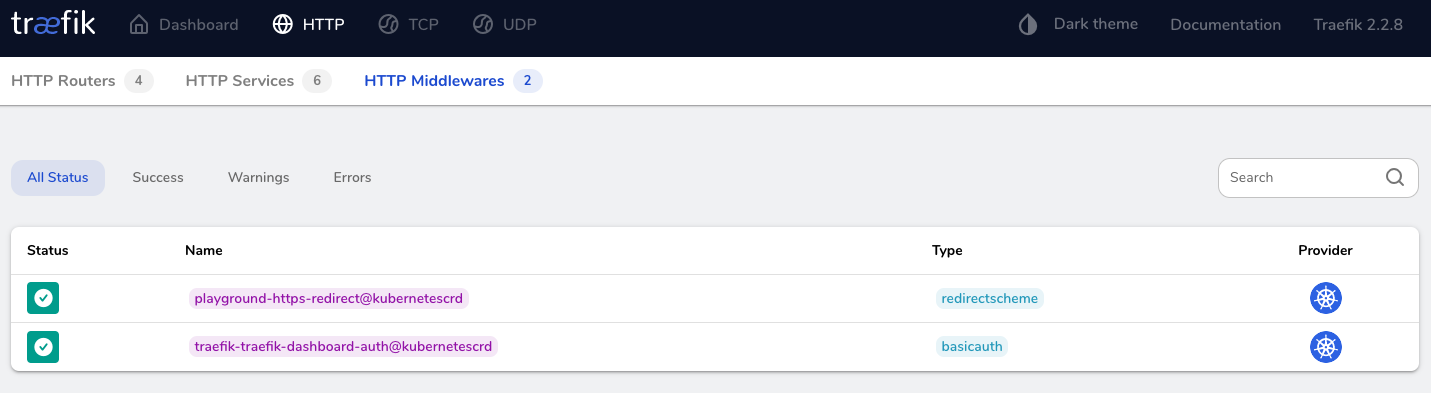
Show HTTP Middlewares
-
Set a hosted name
whoami.MY_DOMAIN.comon a client machine (laptop/desktop)1 2 3 4 5 6
# Edit the file using `sudo /etc/hosts` # Append manualy to the existing k3s hosted name 111.222.333.444 kmaster, traefik.MY_DOMAIN.com, whoami.MY_DOMAIN.com # Alternatively, add a new hosted name entry with a one-liner echo -e "111.222.333.444\twhoami.MY_DOMAIN.com" | sudo tee -a /etc/hosts
Note: Replace111.222.333.444with thek3smaster node IP address andMY_DOMAINwith your domain name. -
Open a web-browser at
https://whoami.MY_DOMAIN.comand check that you can get a response from the service(s)
Summary
Congratulations on completing a major part of deploying an ingress controller on your Kubernetes cluster ! :muscle:
What now? Now that you are familiar with how to use Traefik as an ingress controller, you can simplify the inter-services communication within the cluster and expose applications APIs / Web-UI and such via HTTPS in no time.
Please leave your comment, suggestion or any other input you think is relevant to this post in the discussion below.
Thanks !
Credits: Logo by traefik.io

Discussion