Install a private Docker registry as part of a Kubernetes cluster to become available for any resource on the local home network.
- Preparation
- Registry
- Registry Ingress
- Dashboard
- Dashboard Ingress
- Docker Registry Mirror
- Usage
- Summary
Prerequisites
- Setting Up a Raspberry Pi Cluster
- Install Rancher K3s on Raspberry Pi Cluster
- Installing Helm, Kubernetes Package Manager
- Install Certificate Manager Controller in Kubernetes
- Install Traefik Ingress Controller in Kubernetes
Preparation
In this section we will mount an external storage device into a dedicated Kubernetes node, make it available as a static local storage for the Docker registry pod which is intended to run on that node.
External Volume
External storage devices can be a USB stick, external Hard Disk Drive (HDD) and other such devices. To connect an external storage device please follow the post Mount Storage Volumes onto Linux Operating Systems.
Persistent Storage
Once an external storage is ready and connected we will want to use it as a persistent volume and write data to it from pods running on the Kubernetes node it is connected to. To achieve this behavior we will have to tell Kubernetes that this volume is available by using the PersistentVolume and PersistentVolumeClaim resources.
PersistentVolume (PV)
PV is a storage definition provisioned manually by the user or provisioned dynamically using a storage class
When creating the registry as a Kubernetes resource, we will have to tell the registry that we want it to save its own data on the external storage device rather than on the Raspberry Pi SD card. In order to do so, we will assign a statically provisioned local persistent storage that we have mounted manually.
We will use Kubernetes PersistentVolume (PV) which is a resource describing an independent volume detached from any pod/node lifecycle.
-
Create a
PersistentVolumeusing alocalstorage-class, mounted on thekmasternode1 2 3 4 5 6 7 8 9 10 11 12 13 14 15 16 17 18 19 20 21 22 23 24
cat <<EOF | kubectl apply -f - apiVersion: v1 kind: PersistentVolume metadata: name: docker-registry-pv spec: capacity: storage: 60Gi volumeMode: Filesystem accessModes: - ReadWriteOnce persistentVolumeReclaimPolicy: Delete storageClassName: docker-registry-local-storage local: path: /mnt/container-registry nodeAffinity: required: nodeSelectorTerms: - matchExpressions: - key: kubernetes.io/hostname operator: In values: - kmaster EOF
Note: Make sure to use the same mount point as you have used when mounting the external storage device onto the Raspberry Pikmasternode i.e/mnt/container-registry. -
Verify the persistent volume was properly created
1
kubectl get pv docker-registry-pv
PersistentVolumeClaim (PVC)
PVC is a claim to use a durable pre-defined abstract PV storage with size and access-mode consideration without exposing the user of how those volumes are implemented.
-
Create a
container-registrynamespace1
kubectl create namespace container-registry
-
Create a
PersistentVolumeClaimusing alocalstorage-class, mounted on thekmasternode1 2 3 4 5 6 7 8 9 10 11 12 13 14 15
cat <<EOF | kubectl apply -f - apiVersion: v1 kind: PersistentVolumeClaim metadata: name: docker-registry-pv-claim namespace: container-registry spec: accessModes: - ReadWriteOnce volumeMode: Filesystem resources: requests: storage: 60Gi storageClassName: docker-registry-local-storage EOF
-
Verify the persistent volume claim was properly created and it is bounded to
docker-registry-pv1 2 3 4
kubectl get pvc docker-registry-pvc --namespace container-registry # NAME STATUS VOLUME # docker-registry-pv-claim Bound docker-registry-pv
Registry
The following steps instruct you how to install a Docker registry using a persistent external storage device (a.k.a non-volatile storage) and making the registry available across the entire cluster nodes to interact with.
Authentication
-
Generate a user & password using
htpasswd1 2 3 4 5 6 7 8 9 10 11 12 13 14 15 16 17 18 19
bash <<'EOF' # Change these credentials to your own export REGISTRY_USER=admin export REGISTRY_PASS=registry export DESTINATION_FOLDER=${HOME}/temp/registry-creds # Backup credentials to local files (in case you'll forget them later on) mkdir -p ${DESTINATION_FOLDER} echo ${REGISTRY_USER} >> ${DESTINATION_FOLDER}/registry-user.txt echo ${REGISTRY_PASS} >> ${DESTINATION_FOLDER}/registry-pass.txt docker run --entrypoint htpasswd registry:2.7.0 \ -Bbn ${REGISTRY_USER} ${REGISTRY_PASS} \ > ${DESTINATION_FOLDER}/htpasswd unset REGISTRY_USER REGISTRY_PASS DESTINATION_FOLDER EOF
Note: Sincehtpasswdwas removed from latest docker images we will be using version2.7.0, for additional information read here.
Prepare
We want Kubernetes to create the docker-registry pod on the kmaster node. In order to do that, we’ll have to label that node and use nodeSelector attribute when installing docker-registry Helm chart.
-
Get all nodes names and labels
1
kubectl get nodes --show-labels -
Label
kmasternode withnode-type=master1
kubectl label nodes kmaster node-type=masterNote: I’ll refer to the master node namedkmasteras specified in the RPi cluster installation post, replace the name with the one you have assigned to the master node on your Kubernetes cluster. -
Verify that label had been created successfully
1
kubectl get nodes --show-labels | grep node-type
Install
-
Create a
container-registrynamespace, if it doesn’t exists yet1
kubectl create namespace container-registry
-
Add the
twuni/docker-registryHelm repository successor of previousstable/docker-registry1
helm repo add twuni https://helm.twun.io
-
Update local Helm chart repository cache
1
helm repo update
-
Search for latest
twuni/docker-registryHelm chart version1 2 3 4
helm search repo docker-registry # NAME CHART VERSION APP VERSION # twuni/docker-registry 1.10.1 2.7.1
-
Install the
docker-registryHelm chart using the version from previous stepWith persistence and node affinity:
1
2
3
4
5
6
7
8
9
10
11
12
helm upgrade --install docker-registry \
    --namespace container-registry \
    --set replicaCount=1 \
    --set persistence.enabled=true \
    --set persistence.size=60Gi \
    --set persistence.deleteEnabled=true \
    --set persistence.storageClass=docker-registry-local-storage \
    --set persistence.existingClaim=docker-registry-pv-claim \
    --set secrets.htpasswd=$(cat $HOME/temp/registry-creds/htpasswd) \
    --set nodeSelector.node-type=master \
    twuni/docker-registry \
    --version 1.10.1
Without persistence or node affinity:
1
2
3
4
5
6
helm upgrade --install docker-registry \
    --namespace container-registry \
    --set replicaCount=1 \
    --set secrets.htpasswd=$(cat $HOME/temp/registry-creds/htpasswd) \
    twuni/docker-registry \
    --version 1.10.1
-
Verify installation
1
2
# Make sure docker-registry pod is running
kubectl get pods --namespace container-registry | grep docker-registry
Uninstall
-
Remove
docker-registryfrom the cluster1
helm uninstall docker-registry --namespace container-registry -
Clear the
container-registrynamespace1
kubectl delete namespaces container-registry
Registry Ingress
We will expose the Docker registry using traefik ingress controller, it will allow access to the the registry via HTTPS with proper TLS/Cert.
Certificate
We will create a certificate using cert-manager to allow accessing the docker-registry using the hosted name registry.MY_DOMAIN.com within our home network. Create a self signed certificate as described in here under container-registry namespace.
Verify that a TLS secret had been created for the certificate:
1
kubectl get secret MY_DOMAIN-com-cert-secret --namespace container-registry
Configure
-
Create an
IngressRoutefor accessing the Docker registry, make sure to replaceMY_DOMAINwith your domain name1 2 3 4 5 6 7 8 9 10 11 12 13 14 15 16 17 18 19 20 21 22 23 24 25 26 27 28 29 30 31 32 33 34 35 36 37 38 39 40 41 42 43
cat <<EOF | kubectl apply -f - apiVersion: traefik.containo.us/v1alpha1 kind: IngressRoute metadata: name: docker-registry namespace: container-registry spec: entryPoints: - websecure routes: - kind: Rule match: Host(\`registry.MY_DOMAIN.com\`) services: - kind: Service port: 5000 name: docker-registry namespace: container-registry # No basic auth middleware is required since secrets are set up during registry creation middlewares: - name: docker-registry-cors namespace: container-registry tls: secretName: MY_DOMAIN-com-cert-secret --- apiVersion: traefik.containo.us/v1alpha1 kind: Middleware metadata: name: docker-registry-cors namespace: container-registry spec: headers: accessControlAllowMethods: - GET - OPTIONS - PUT - POST - DELETE accessControlAllowOriginList: - https://registry-ui.MY_DOMAIN.com accessControlAllowCredentials: true accessControlMaxAge: 100 addVaryHeader: true EOF
Note: AMiddlewareresource is being created to allow CORS (Cross Origin Resource Sharing) requests from the registry UI service to the registry domain. -
Check the resource was created successfully
1
kubectl describe ingressroute docker-registry --namespace container-registry -
Define the hosted name
registry.MY_DOMAIN.comon the client machine (laptop/desktop)1 2 3 4 5 6
# Edit the file using `sudo /etc/hosts` # Append manually to the existing k3s master hosted name 111.222.333.444 kmaster, registry.MY_DOMAIN.com # Alternatively, add a new hosted name entry with a one-liner echo -e "111.222.333.444\tregistry.MY_DOMAIN.com" | sudo tee -a /etc/hosts
Note: Replace111.222.333.444with the node IP address the registry was deployed on, which in the example above is thekmasternode. ReplaceMY_DOMAINwith your domain name. -
Verify access to the registry by replacing
MY_DOMAINwith yours1 2 3 4 5 6 7 8 9 10 11 12
export USER=$(cat $HOME/temp/registry-creds/registry-user.txt) export PASSWORD=$(cat $HOME/temp/registry-creds/registry-pass.txt) curl -kiv -H \ "Authorization: Basic $(echo -n "${USER}:${PASSWORD}" | base64)" \ https://registry.MY_DOMAIN.com/v2/_catalog wget --no-check-certificate --header \ "Authorization: Basic $(echo -n "${USER}:${PASSWORD}" | base64)" \ https://registry.MY_DOMAIN.com/v2/_catalog unset USER PASSWORD
-
Open browser at https://registry.MY_DOMAIN.com/v2/_catalog
Note: If you encounter an untrusted certificate warning, please follow the cert-manager post Trust section for instructions on how to trust theregistrycertificate.
Dashboard
We will install a web user interface to simplify interactions with the private Docker registry. The dashboard we will use is based on Joxit Docker Registry UI which is an excellent lightweight and simple solution for Docker registry web UI (see example).
The Docker Registry UI repository has a helm chart but it is missing a chart index.yaml metadata, as a result we will have to clone the repository and perform a Helm installation from disk manually.
We will rely on previously installed docker registry, thus we will indicate in the dashboard Helm chart that an external repository should be used instead of creating its own.
Install
-
Clone
docker-registry-uirepository1 2
mkdir -p $HOME/temp/docker-registry-ui git clone https://github.com/Joxit/docker-registry-ui.git $HOME/temp/docker-registry-ui
-
Install the
docker-registry-uiHelm chart from local path, replaceMY_DOMAINwith yours1 2 3 4 5 6 7 8 9 10 11 12
helm upgrade --install docker-registry-ui \ --namespace container-registry \ --set registry.external=true \ --set registry.url=https://registry.MY_DOMAIN.com \ --set ui.title="Docker Registry UI" \ --set ui.replicaCount=1 \ --set ui.nodeSelector.node-type=master \ --set ui.image.tag=main \ --set ui.delete_images=true \ --set ui.ingress.enabled=false \ --set ui.proxy=false \ $HOME/temp/docker-registry-ui/examples/helm/docker-registry-ui
Important: Make sure that the Docker imagemaintag in use byui.image.tagattribute has a Raspberry Pi ARMv7 supported OS architecture. Check here for availabledocker-registry-uiimage tags.Note: Notice that we rely on anodeSelectorlabel that we have created before so the registry UI would get deployed on the same node of the registry itself which is on the master node. -
Verify installation was successful
1
2
# Make sure docker-registry-ui pod is running
kubectl get pods --namespace container-registry | grep docker-registry-ui
Uninstall
-
Remove
docker-registry-uifrom the cluster1
helm uninstall docker-registry-ui --namespace container-registry
Known Issues
The registry web UI has a few known issues, in here you will find ways to mitigate them.
Image Deletion
When deleting an image from the registry web UI, the image name remains and still shown in the UI, follow this GitHub issue for additional information.
If the empty image names bothers you, the easiest way to clear them out is to delete the image folder from the mounted storage that holds the private registry images.
-
SSH to the node that is connect to the registry storage (
kmasteras as described in this post)1
ssh pi@kmaster
-
Delete the directory of the image you removed from the web UI (which still remains as a list entry)
1 2
sudo rm -rf \ /mnt/container-registry/docker/registry/v2/repositories/<IMAGE-NAME-TO-DELETE>
Dashboard Ingress
We will expose the Docker registry UI using traefik ingress controller, it will allow access to the the registry UI via HTTPS with proper TLS/Cert.
Authentication
We will create basic authentication for accessing the Docker registry Web UI.
-
Generate a user & password using
htpasswd1 2 3 4 5 6 7 8 9 10 11 12 13 14 15 16 17 18
bash <<'EOF' # Change these credentials to your own export REGISTRY_UI_USER=admin export REGISTRY_UI_PASS=dashboard export DESTINATION_FOLDER=${HOME}/temp/registry-ui-creds # Backup credentials to local files (in case you'll forget them later on) mkdir -p ${DESTINATION_FOLDER} echo ${REGISTRY_UI_USER} >> ${DESTINATION_FOLDER}/registry-ui-user.txt echo ${REGISTRY_UI_PASS} >> ${DESTINATION_FOLDER}/registry-ui-pass.txt htpasswd -Bbn ${REGISTRY_UI_USER} ${REGISTRY_UI_PASS} \ > ${DESTINATION_FOLDER}/htpasswd unset REGISTRY_UI_USER REGISTRY_UI_PASS DESTINATION_FOLDER EOF
-
Create a Kubernetes secret to be used for dashboard access
1 2 3
kubectl create secret generic docker-registry-ui-secret \ --from-file=$HOME/temp/registry-ui-creds/htpasswd \ --namespace container-dashboard
-
Verify secret created successfully
1
kubectl get secret docker-registry-ui-secret --namespace container-dashboard
Certificate
Configure instructions in case you have already created a certificate for the Docker registry in the previous steps since they both share the same wildcard domain *.MY_DOMAIN.com under the same namespace.We will create a certificate using cert-manager to allow accessing the docker-registry-ui using the hosted name registry-ui.MY_DOMAIN.com within our home network. Create a self signed certificate as described in here under container-registry namespace.
Verify that a TLS secret had been created for the certificate:
1
kubectl get secret MY_DOMAIN-com-cert-secret --namespace container-registry
Configure
-
Create an
IngressRoutefor accessing the Docker registry web UI, make sure to replaceMY_DOMAINwith your domain name1 2 3 4 5 6 7 8 9 10 11 12 13 14 15 16 17 18 19 20 21 22 23 24 25 26 27 28 29 30 31 32
cat <<EOF | kubectl apply -f - apiVersion: traefik.containo.us/v1alpha1 kind: IngressRoute metadata: name: docker-registry-ui namespace: container-registry spec: entryPoints: - websecure routes: - kind: Rule match: Host(\`registry-ui.MY_DOMAIN.com\`) services: - kind: Service port: 80 name: docker-registry-ui-ui # Suffix added by the Helm chart namespace: container-registry middlewares: - name: docker-registry-ui-auth namespace: container-registry tls: secretName: MY_DOMAIN-com-cert-secret --- apiVersion: traefik.containo.us/v1alpha1 kind: Middleware metadata: name: docker-registry-ui-auth namespace: container-registry spec: basicAuth: secret: docker-registry-ui-secret EOF
-
Check the resource was created successfully
1
kubectl describe ingressroute docker-registry-ui --namespace container-registry -
Define the hosted name
registry-ui.MY_DOMAIN.comon the client machine (laptop/desktop)1 2 3 4 5 6
# Edit the file using `sudo /etc/hosts` # Append manualy to the existing k3s master hosted name 111.222.333.444 kmaster, registry.MY_DOMAIN.com, registry-ui.MY_DOMAIN.com # Alternatively, add a new hosted name entry with a one-liner echo -e "111.222.333.444\tregistry-ui.MY_DOMAIN.com" | sudo tee -a /etc/hosts
Note: Replace111.222.333.444with the node IP address the registry web UI was deployed on, which in the example above is thekmasternode. ReplaceMY_DOMAINwith your domain name. -
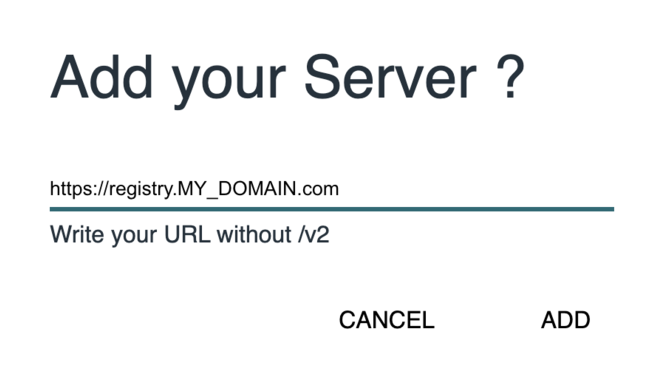
Open browser at https://registry-ui.MY_DOMAIN.com and add the registry URL as a new server
Note: If you encounter an untrusted certificate warning, please follow the cert-manager post Trust section for instructions on how to trust theregistry-uicertificate. -
Register the docker registry URL as a new server
Fresh Registry UI
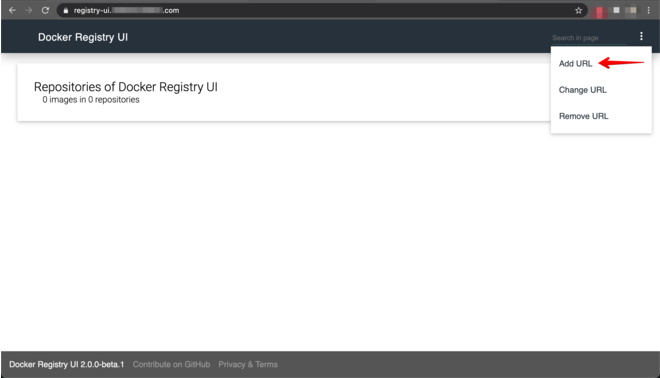
Add a New Server
 Note: Make sure to supply basic auth credentials for both registry and registry-ui when asked via the user/pass pop-up.
Docker Registry Mirror
Now that we have a running private Docker registry, we would like to interact with it from within the Kubernetes cluster (k3s in our case) and allow nodes to pull private images. In order to so that we should tell Kubernetes that registry.MY_DOMAIN.com is another mirror for pulling docker images.
k3s. For other distributions, please refer to the official documentation for adding another Docker registry mirror.k3s uses a container runtime called containerd directly (no docker). We will create a configuration file containing our private registry domain name, auth secrets and certificate secrets.
These instructions MUST be applied on all the Kubernetes nodes on the Raspberry Pi cluster, in this example we will focus on the kmaster node.
-
Copy the certificate secrets (cert_file, key_file, ca_file) to each of the cluster nodes
1 2 3 4 5 6 7 8
# Create a dedicated folder on remote server ssh pi@kmaster "sudo mkdir -p /tmp/container-registry" # Change permissions on the destination folder ssh pi@kmaster "sudo chmod 777 /tmp/container-registry" # Copy client certificate, client key, CA certificate scp -r $HOME/temp/container-registry/cert-secrets pi@kmaster:/tmp/container-registry
Note: This step assume that the certificate secrets were exported locally to$HOME/temp/container-registry/cert-secretsas instructed in the cert-manager post. -
Create a
/etc/rancher/k3s/registries.yamlfile on the remote server, replaceMY_DOMAIN, user & pass where necessary1 2 3 4 5 6 7 8 9 10 11 12 13 14 15
ssh pi@kmaster "sudo tee /etc/rancher/k3s/registries.yaml > /dev/null <<EOT mirrors: \"registry.MY_DOMAIN.com\": endpoint: - \"https://registry.MY_DOMAIN.com\" configs: \"registry.MY_DOMAIN.com\": auth: username: <insert-registry-user-here> password: <insert-registry-pass-here> tls: cert_file: /tmp/container-registry/cert-secrets/cert_file.crt key_file: /tmp/container-registry/cert-secrets/key_file.key ca_file: /tmp/container-registry/cert-secrets/ca_file.crt EOT"
-
Verify the file created successfully
1
ssh pi@kmaster "cat /etc/rancher/k3s/registries.yaml" -
Add the host name
registry.MY_DOMAIN.comto the node’s hosts file (only if we are using a non-registered self domain)On the registry node
1
2
# Append to kmaster node hosts file
ssh pi@kmaster "echo -e "127.0.1.1\tregistry.MY_DOMAIN.com" | sudo tee -a /etc/hosts"
On other cluster nodes
1
2
# Append to worker node hosts file (Replace X with node number)
ssh pi@knodeX "echo -e "REPLACE_WITH_REGISTRY_NODE_IP\tregistry.MY_DOMAIN.com" | sudo tee -a /etc/hosts"
-
Restart
k3sservice on master or agent nodes, according to which node you are adding the docker mirror1 2 3 4 5 6 7
# Restart master node ssh pi@kmaster sudo systemctl restart k3s # Restart worker nodeX (replace X with node number) ssh pi@knodeX sudo systemctl restart k3s-agent
Note: We must restart thek3s-server/k3s-agentfor registry changes to take effect sincek3swill check to see if aregistries.yamlfile exists upon startup and instruct containerd to use any registries defined in the file as Docker mirrors. -
Verify k3s server/agent started in active (running) mode
1
2
3
4
5
ssh pi@kmaster
systemctl status k3s.service

ssh pi@knodeX
systemctl status k3s-agent.service
Note: Perform these steps again for every Kubernetes node which is a part of the Raspberry Pi cluster i.e.kmaster,knode1,knode2…knodeN.
Usage
In this section we will verify that we can interact with the private Docker registry from:
- Client machine (laptop / desktop)
- Raspberry Pi cluster node(s)
- Kubernetes cluster by deploying a pod that is using a private image
Docker Client
Docker client has two approaches of interacting with a private docker registry - Trusted vs. Insecure.
Trusted Registry
When interacting with the private Docker registry using a Docker client, it is advised to have a valid certificate for registry.MY_DOMAIN.com. If we’re using a self signed one we can register it as specified in the Trust section of the cert-manager post.
Insecure Registry
If you want the fast-and-dirty approach (which isn’t recommended) to push images from a client machine to the private Docker registry, you can tell Docker to treat the private registry as insecure.
-
Edit the
deamon.json(on macOS viaDocker->Preferences->Docker Engine) -
Add the following:
1
2
3
{
   "insecure-registries" : ["registry.MY_DOMAIN.com"]
}
-
Restart Docker
Pull/Tag/Push
We will use a Docker client to pull a busybox image for ARM architecture, tag it and push it to the private Docker registry.
The fact that we are working on different architectures prevent us from pulling images on client machine (would pull according to the local machine arch), pushing them to the private registry and then pulling them from within the cluster (unsupported arch).
Doing so would result on the exec format error error, for example:
1
2
3
standard_init_linux.go:219: exec user process caused: exec format error
pod "busybox-blog-hello" deleted
pod playground/busybox-blog-hello terminated (Error)
In order to solve that limitation, we’ll have to specify the exact build SHA of the image when pulling from a non-ARM based machine.
-
Login to the remote private registry
1
2
3
4
docker login \
   -u $(cat $HOME/temp/registry-creds/registry-user.txt) \
   -p $(cat $HOME/temp/registry-creds/registry-pass.txt) \
   https://registry.MY_DOMAIN.com
-
Get the
busybox:latestSHA of the tag which is suitable to thelinux/arm/v7architecture, click here for available tags -
Pull the
busyboximage suitable forarm/v7architecture1 2
docker pull \ busybox@sha256:fd659a6f4786d18666586ab4935f8e846d7cf1ff1b2709671f3ff0fcd15519b9 -
Tag image with a custom name and append the private registry domain name prefix
1
2
3
docker tag \
 busybox@sha256:fd659a6f4786d18666586ab4935f8e846d7cf1ff1b2709671f3ff0fcd15519b9 \
 registry.MY_DOMAIN.com/busybox-blog-armv7
-
Push image to the private registry
1
docker push registry.MY_DOMAIN.com/busybox-blog-armv7
-
Verify that you can read the image manifest
1
2
3
curl -ksS \
   -u $(cat $HOME/temp/registry-creds/registry-user.txt):$(cat $HOME/temp/registry-creds/registry-pass.txt) \
   https://registry.MY_DOMAIN.com/v2/busybox-blog-armv7/manifests/latest
-
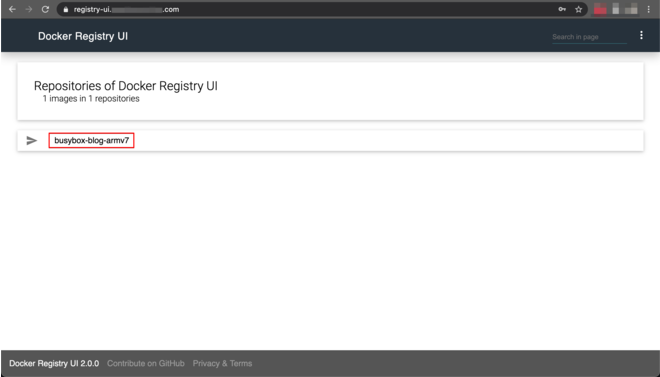
(Optional): verify the image information on the Docker registry web UI at
registry-ui.MY_DOMAIN.comRegistry UI View
crictl
What is crictl ?
It is a CLI of the container runtime which we use from within a Raspberry Pi server to interact with the private registry.
How to install crictl ?
The k3s Kubernetes distribution we are using on top of the Raspberry Pi cluster installed crictl for us. The RPi boards architecture is ARMv7, it means that if we will pull images from within a RPi server using crictl it will pull the appropriate arm/v7 image built for the ARM architecture, rather than relying on a specific SHA (as described on the Docker Client section).
busybox image check the available tags in here.crictl doesn’t support tag & push operations, you are welcome to follow this GitHub feature request if anything should change in the future.Pull
-
SSH into a remote server, either master or worker
1
2
3
4
5
# Connect to master node
ssh pi@kmaster

# Connect to worker node (replace X with node number)
ssh pi@knodeX
-
Pull the
busybox-blog-armv7image we have previously pushed using Docker client, replace to the appropriate user & pass1 2 3
sudo crictl pull \ --creds <REGISTRY_USER>:<REGISTRY_PASS> \ registry.MY_DOMAIN.com/busybox-blog-armv7
Kubernetes Pod
We will create a running Kubernetes pod on the playground namespace using an image pulled from the private registry. Make sure to follow the Docker Client step to properly push the busybox-blog-armv7 image to the private registry.
-
Create an ephemeral pod that prints the node architecture, a hello greeting and terminates itself
1
2
3
4
5
6
7
8
kubectl run --rm -t -i busybox-blog-hello \
   --namespace playground \
   --restart Never \
   --image registry.MY_DOMAIN.com/busybox-blog-armv7 \
   --overrides='{"spec": { "nodeSelector": {"node-type": "master"}}}' \
   -- sh -c 'sleep 3; \
             echo "Architecture: $(uname -m)"; \
             echo "Message: Hello from Kubernetes!"'
Note: Replace the node selector according to the node type the pod should be assigned to i.e. for checking private registry on worker node #1 we should use"node-type": "node1". -
Verify the pod is created successfully
1
kubectl describe pod busybox-blog-hello --namespace playground
Pod Pull Image Events

Summary
Wow ! This post is indeed a long one with many pieces of information required to be glued together to grasp the big picture.
I hope that you have successfully created a running private registry and by doing that, you feel confident enough to host freely any image you can think about on any storage device as simple as any USB stick lying around to use within your Kubernetes cluster :heart_eyes:
Don’t limit yourself to a pricing/subscription model, just replace/add a new storage device to suite your needs without suffering from any data transfer cap for your homelab.
What now? Build any custom images you wish and store them within the new private Docker registry you have created. Stay tuned for blog posts describing real use cases of custom images hosted on the private Docker registry.
Please leave your comment, suggestion or any other input you think is relevant to this post in the discussion below.
Thanks !

Discussion